
Unreal in the Screel editor
Follow a linked Unreal sequence in the Screel editor, and send commands to your Unreal editor. The scenes follow the markers in Sequencer. While you are signed in, Screel in your browser can reach your editor. Commands from Screel go to your own Unreal editor, never to a teammate’s. An editor signed in with an API key does not receive them.
The Unreal panel
Section titled “The Unreal panel”The Unreal button in the editor top bar opens the Unreal panel. The button appears only in projects linked to a sequence. Linking happens in Unreal: choose Create project… or Link to existing project… in the Sequencer Screel menu. See Link a sequence.
The panel shows the live state of your Unreal editor and one block per linked sequence.
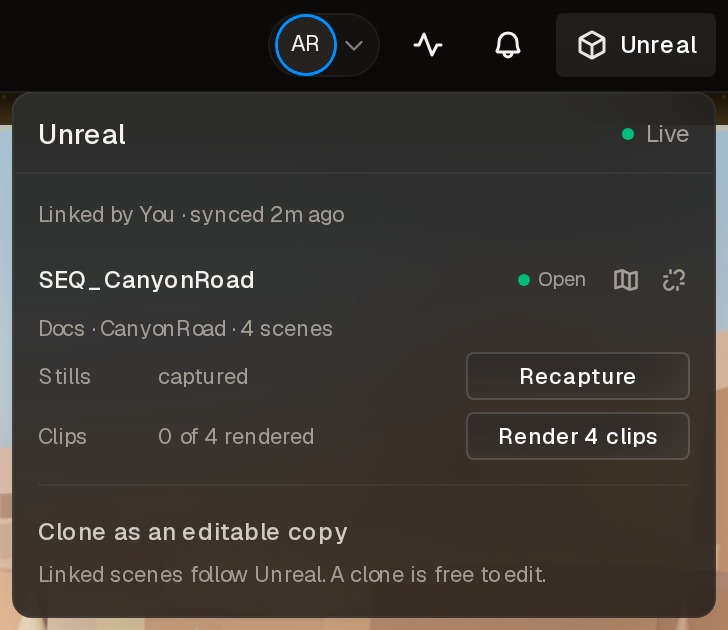
- The panel header reads Live while your editor has a linked sequence of the project open, with the current work, such as Capturing 2/4 or Rendering 1/3. Otherwise it reads Unreal running, Reconnecting or Offline. Below it, a line says who linked the project and when it last synced.
- A status dot beside Unreal on the top bar button flags a problem. It shows when Unreal is offline or reconnecting, your plugin needs an update, or a teammate holds a sequence. Hover the button to read which.
- When a newer Screel plugin is out, a note below that line reads “Screel plugin <version> is available for Unreal.” When your plugin is too old to sync, it reads “Update the Screel plugin in Unreal to <version>. Syncs fail until you do.” Get it links to the download.
- Each sequence shows Open, Not open, or the name of the person editing it. Its icons open the sequence in Unreal, open only its level, and unlink it.
- The Stills row’s Recapture retakes the still of every marker in the sequence.
- The Clips row counts rendered clips. Render 4 clips, for example, renders the four markers without a clip. Once all are rendered, the button renders every clip again.
- While a batch runs, a progress line such as “Rendering 1/3 · Scene 2 · 40%” shows above the sequences. Its Cancel batch stops the whole Unreal batch.
These commands need your Unreal editor running with the sequence open. When they cannot run, the button’s tooltip says why. A required plugin update blocks Recapture and Render clip.
Unlinking from the panel asks first. The scenes keep their stills and clips, and their markers stop syncing with Unreal.
Scenes follow Unreal
Section titled “Scenes follow Unreal”In a linked project, Unreal owns the scene list. The scenes list groups scenes under their sequence, one scene per Sequencer marker. Each group header shows the scene count and whether the sequence is Open in Unreal. Scenes that belong to no sequence sit under Unlinked scenes.
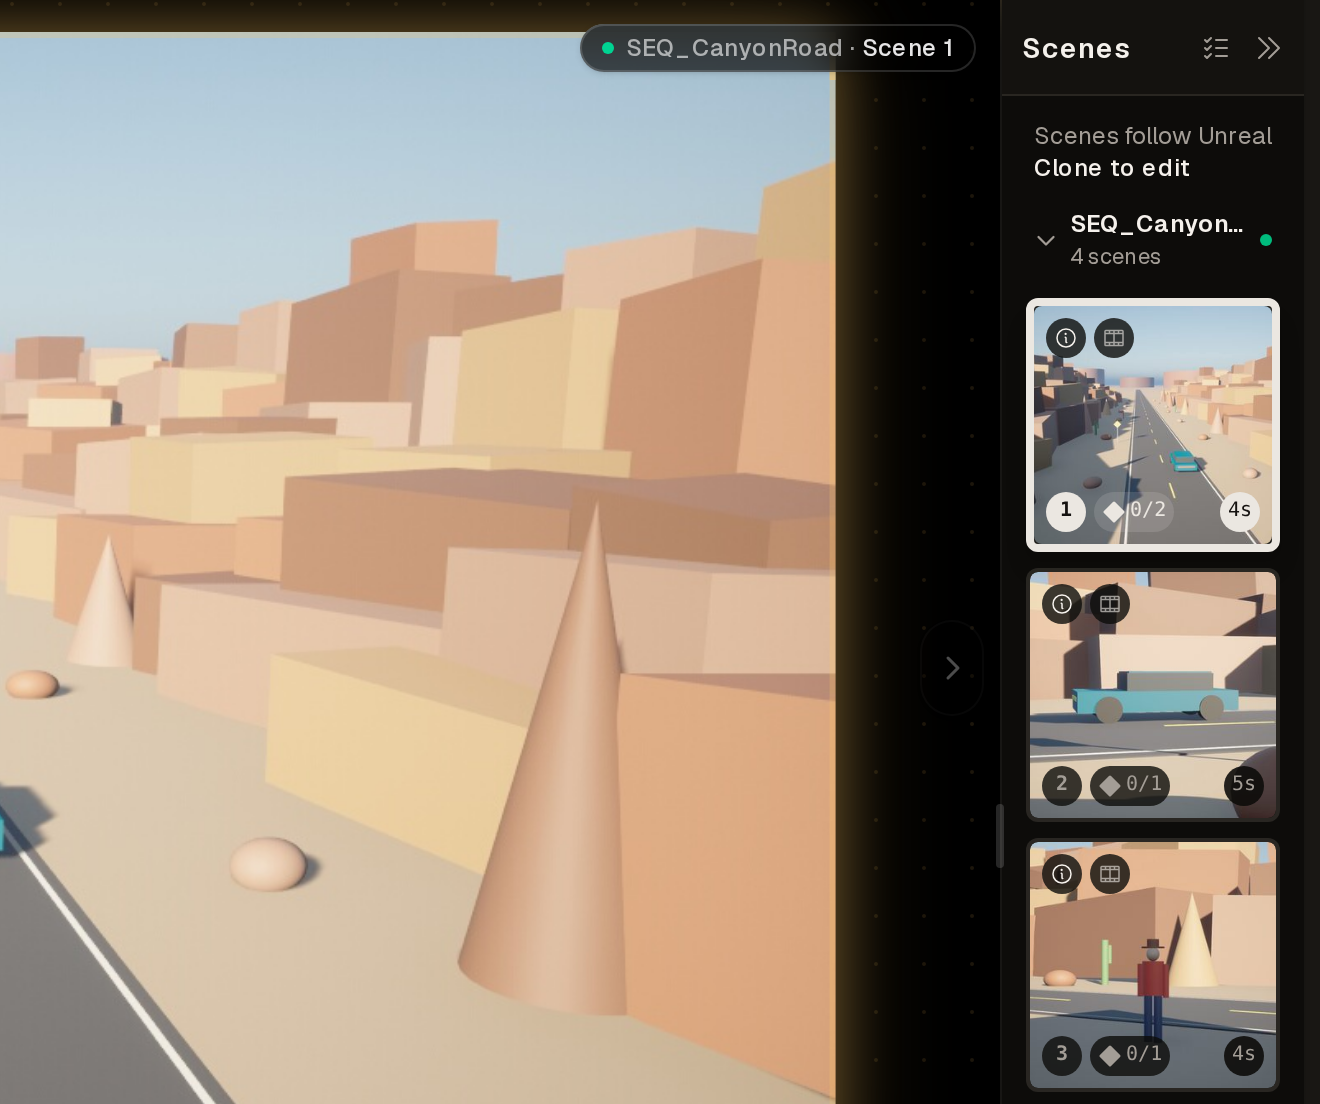
You cannot add, duplicate, delete or reorder scenes in a linked project. Those buttons explain: “This project is linked to Unreal. Clone it to edit scenes freely.” Change markers in Sequencer instead, and the scenes follow.
When you select several scenes, the list offers Render in Unreal and Recapture for just those markers. It also offers Refine stills and keyframes and Refine clips, which refine every selected scene with one prompt. Refine clips refines each clip from its clay clip and its styled keyframes.
Each scene card shows the state of its still, its keyframes and its clip. A star stands for the still and a diamond for each keyframe. A filled mark is styled, and an outlined mark is not styled yet. A play mark stands for the clip: filled when a refine made it, outlined when it is the previs. A dot marks a picture that is out of date. A narrow card shows the styled count and the clip mark only.
Clone to edit
Section titled “Clone to edit”To edit the scenes freely, make a copy. Clone to edit above the scenes list opens the Unreal panel, where Clone as an editable copy creates a copy of the project and opens it. Linked scenes follow Unreal; a clone is free to edit.
Keyframes on the canvas
Section titled “Keyframes on the canvas”The bar below the picture switches between a scene’s clip, its still and its keyframes.
- Clip shows the scene’s clip. A scene with no clip has no Clip item. A dot on it marks a refined clip that came from an older previs.
- The row of pictures starts with the still. Its item shows a star and the still’s second, such as “0 s”.
- One item per keyframe follows, labelled by its second (“4 s”), earliest first. Select an item to view it.
- A filled diamond marks a styled picture. An outlined diamond marks a picture that is not styled yet. A spinner shows while a keyframe extracts, and a red diamond marks a failed one. A dot marks a picture that is out of date.
- Hover an item, or a pin on the filmstrip, to see its Raw and Styled pictures.
- Raw | Styled switches the still, a keyframe or the clip between its raw and its styled version. Raw on the clip shows the previs.
- Press
[and]to step through the still and the keyframes. Press V to switch between the still and the clip. Press Shift+V to flip between Raw and Styled.
A scene without keyframes and without a styled still shows Still and Clip instead.
Keyframes work on scenes with no clip as well as scenes with a clip. On an Unreal scene, the still is a key of the marker; see Add keys.
Keyframes you add in Screel can sit between whole seconds. A clip refine keeps each keyframe at its exact time.
Passes on keyframes
Section titled “Passes on keyframes”The Passes menu (Clay, Depth, Object ids and the scene’s layers) applies to the still and to every keyframe. Press L or Shift+L to step through the passes. [ and ] keep the chosen pass while you step. Hide pass goes back to the picture. Compare on a styled keyframe wipes Styled against Raw.
A keyframe without the chosen pass shows its picture, and the pass button notes that the keyframe lacks the pass.
Move Unreal keys
Section titled “Move Unreal keys”While your Unreal editor has the sequence open, drag an Unreal key on the filmstrip to move it. Unreal moves the key as if you dragged it there, and captures its new frame. The pin reads Moving until the sync lands. Before you move a styled key, Screel asks first: the new capture replaces its styled picture, and the scene history keeps it. Set as still in the key’s menu makes that key the still key. Remove an Unreal key in Unreal.
You cannot move a key while Unreal is not running, another editor holds the sequence, or you cannot edit the project. The pin then says why, such as “Open Sequence01 in Unreal to move its keys.” When a move fails, the pin returns to its frame. An older plugin asks you to update it first.
Refine the still and every keyframe
Section titled “Refine the still and every keyframe”The edit button names where a refine starts.
- Refine from raw starts from the raw picture. It shows for a picture with a raw version, in the Raw view or while the picture is not styled yet. Screel keeps the staging and repaints every surface in the look you ask for.
- Refine edits the styled picture as it is.
To set a look, mention a style reference document in the prompt, such as “@Slay look”. Name who is who with more mentions, such as “the creature on the left is @Echo”. Each refine makes one version. Refine again for another version. History keeps the earlier ones.
A refine from raw saves its prompt with the scene, and Screel offers it again after a recapture. A styled still or keyframe is out of date when its raw picture changes in Unreal. A new render of the same frame keeps it current.
When you edit the still or a keyframe of a scene that has keyframes, the composer footer shows a Still and keyframes switch. With the switch on, the edit button applies your prompt and @mentions to the still and to each keyframe. Each picture becomes its own job.
The button tooltip shows the credits and lists the pictures, the still first. It lists the keyframes it skips and why, such as a keyframe that is still extracting, out of date or shares its picture.
The switch stays on as you move between scenes until you reload. Markup applies to one picture, so while the picture has markup the button is disabled and says why.
Refine the clip
Section titled “Refine the clip”Refine the clip after you check the still and the keyframes. Select Clip, write the prompt and mention the same look. The composer shows:
- the clay status: Clay with a check mark, or Making clay…
- how many keyframes are styled, such as 3 of 3 keyframes styled
- the resolution: 1080p by default, or 720p, each with its credits
- the credits, on the Refine clip button
Screel sends the scene’s clay clip and its styled keyframes. The new clip keeps the previs timing and takes its look from the keyframes. A 1080p clip costs more credits than a 720p clip.
While only some keyframes are styled, the button is disabled and says why, such as “Refine the keyframes first: 1 of 3 styled”. Styled keyframes that are out of date still go into the clip. A warning beside the button counts them, such as “2 of 3 keyframes out of date”. With a saved prompt, Refine again beside it refines those pictures from raw first.
If the video model refuses a picture, Screel leaves that picture out and tries once more. A message names the picture it left out, such as “The video model refused the keyframe at 2 s. Screel made the clip without it.”
History of keyframes
Section titled “History of keyframes”The History button in the composer footer opens the versions of what an edit would change. With a keyframe selected, it lists that keyframe. With the still in view, it lists the still. With Still and keyframes on, it opens Scene. Use the chips at the top to switch between Scene, Clip, Still and each keyframe.
- Current marks the version each picture shows now.
- In a keyframe list, the last row is Raw: the frame without a style. Click it to undo every edit of that keyframe.
- In Scene, one All keyframes run is one row with a picture for each keyframe it changed. Revert all puts each of them back to its version from that run. The last row, Raw · all keyframes, puts every keyframe back to its raw frame.
- After you revert one keyframe or the still, the canvas selects it and its item on the bar pulses.
Each picture keeps its own 20 most recent versions. Purge deletes old versions, and keeps every version the clip, the still or a keyframe shows now.
Refined scenes and recaptures
Section titled “Refined scenes and recaptures”A scene is refined when it has a styled still, keyframe or clip. Unreal keeps the refined pictures until you ask for new ones.
- An automatic sync applies the marker’s timing. The still and the keys keep their refined pictures, and their raw pictures update. A new key captures as usual.
- A recapture you start replaces the refined still and keyframes with new raw pictures. History keeps the refined versions. Recapture in Screel, a recapture in Unreal and a key you move count.
- Render clip replaces a refined clip with the new previs. The raw still and keys update. The styled ones stay and show out of date.
After a recapture replaces refined pictures, the scene’s Unreal panel and the canvas offer the saved prompt. The card reads like “Recapture replaced the refined still and 2 keyframes. Refine again with the same prompt?”
- Refine again runs the saved prompt from raw on those pictures. The button shows the credits.
- Restore refined puts the refined pictures back from history.
- The close button dismisses the offer.
After Render clip replaces a refined clip, Screel offers Refine clip again.
When a scene turns refined in Screel, Unreal shows a toast such as “Scene 3 refined in Screel” with Open. Several scenes at once read “4 scenes refined in Screel”.
A plugin older than 1.1 cannot replace refined pictures. When it sends new captures of a refined scene, Screel keeps the refined pictures and updates only the timing and the raw pictures. The scene’s Unreal panel then reads “Unreal sent new captures. Screel kept the refined pictures. Update the plugin to recapture refined scenes.” Install the new version of the plugin.
Preview and render sources
Section titled “Preview and render sources”The Scene source setting picks what each scene shows in the render. Find it under Rendering… in the project name menu.
- Auto shows a refined clip. A scene without one cuts between its keyframes when it has a styled keyframe, or a keyframe other than the still. Otherwise it shows the previs.
- Final shows the scene’s clip, else its still.
- Keyframes cuts between the keyframes at their seconds. Each keyframe shows its styled picture, else its raw picture. Still motion does not apply.
- Previs shows the previs clip, else the raw picture of the still.
- Layer: Clay and the other layer entries show that layer of each scene.
A scene without what its source needs shows its final picture. A note below the field counts these scenes. Keyframes, Previs and the layer entries show on a linked project and in Advanced mode.
Compare with renders a second source as a second frame. Comparison layout puts the frames Side by side or Stacked. Auto stacks the frames of a horizontal project and puts the frames of a vertical or square project side by side. Each frame shows the name of its source in its top-left corner. Captions, narration and music play once. A Previs frame beside a frame that cuts keyframes cuts at the same seconds and shows the raw picture of each keyframe.
The Preview window has Source and Compare controls too. They start from the saved settings and change only the preview.
The scene’s Unreal panel
Section titled “The scene’s Unreal panel”On the scene canvas, a linked scene shows an Unreal badge with a status dot. Click it to open the scene’s Unreal panel. The header shows the scene name and an Unreal badge. Below it, a status line reads like “Live · Intro”, the link status and the sequence name.
- The scene’s Span, Camera, Level, Captured time and Passes. Open next to the level loads that level in Unreal.
- Capture: the capture switches of the frame, such as “Fade off · Motion blur off · Depth of field on”. Focus: the camera’s focus distance and f-stop.
- When Share viewport peek is on, a small picture of the Unreal viewport. See Privacy.
- Recapture captures this marker’s still again. Render clip renders the marker span in Unreal as the scene clip. On a refined scene, both replace refined pictures; see Refined scenes and recaptures. The scene actions menu and the Unreal panel offer the same actions under the same names.
- When your plugin needs an update, Recapture, Render clip and key moves are off, and the panel shows the update notice. Open in Unreal still works.
- Follow Unreal selects the scene under the Unreal playhead whenever it moves to another marker. It pauses while your Unreal captures, renders or uploads, so the editor stays on your scene. Scene cards show “Capturing…” or “Rendering…” on the scene Unreal works on.
Open a scene in Unreal
Section titled “Open a scene in Unreal”Screel’s Open in Unreal loads the scene’s level, opens the sequence and puts the playhead on the marker. Unreal asks you to save first if the open level has changes.
When your editor already has the scene’s sequence open, Open in Unreal in the scene’s Unreal panel only moves the Unreal playhead to the marker.
When your editor has another sequence open, the panel shows Open in Unreal at the top. Click it to open the scene’s sequence at this marker.
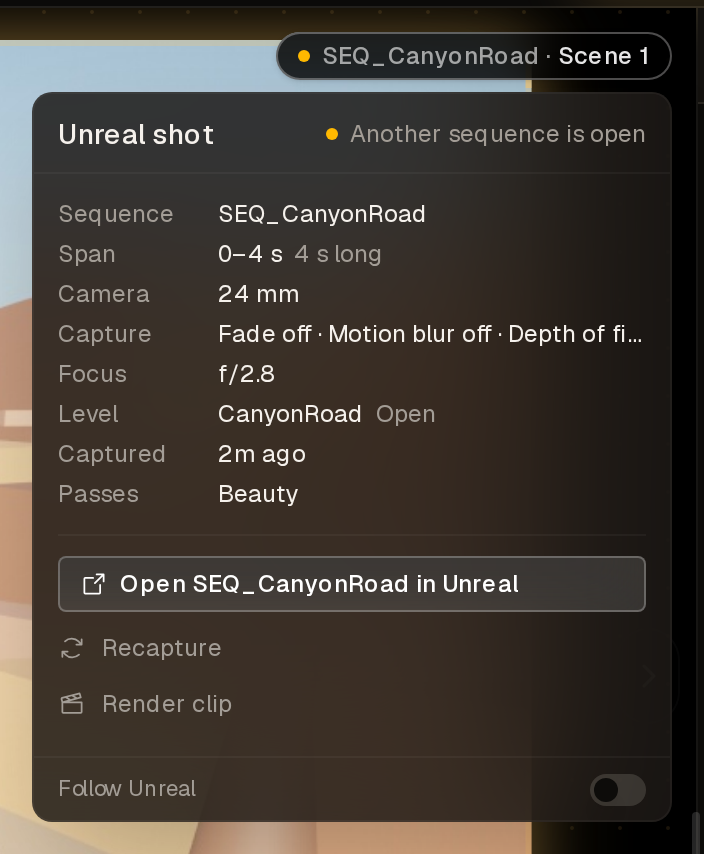
You can also open a whole sequence from its icon in the Unreal panel or from its group header in the scenes list.
One editor per sequence
Section titled “One editor per sequence”Only one Unreal editor edits a linked sequence at a time. If a teammate or your own second editor holds the sequence, the Sequencer toolbar shows a read-only status with Request edit or Take over. The current editor sees a prompt to keep the sequence or hand it over: Keep or Hand over, with a countdown. Edits you make while the sequence is read-only stay in the asset and sync after you regain it.
In Screel, the Unreal panel and a scene’s Unreal panel show who holds the sequence. A Request button asks them to hand it over. Unreal opens the sequence for you once it is yours.
A duplicated sequence asset is a copy of its linked original and does not sync. Its Sequencer toolbar offers Link as a new sequence.