
Send frames
Capture a frame and drop it into your Screel project with Send. It lands in the gallery, a whiteboard or a storyboard panel. From Sequencer, it can also land in a scene. Sign in first. Send also needs a project: a linked sequence, or a project you pick in the Send menu.
Send the viewport
Section titled “Send the viewport”- Frame the shot in the level viewport.
- Choose Send in the level toolbar.
Send in the level toolbar captures the viewport. Its label names the place the frame goes, for example Send → Gallery. The menu next to it (⋮) picks the project and the target. Hover over Send for the details. When nothing is open in Screel, Send uses the last place a picture landed, and the label ends with (last). Open a whiteboard, a storyboard or the gallery in Screel to send there instead.
You can also right-click an actor in the level and choose Send viewport to Screel. The command Send viewport to Screel in the Screel context of Editor Preferences → Keyboard Shortcuts does the same as Send. It has no default shortcut.
Send a frame from Sequencer
Section titled “Send a frame from Sequencer”Send in the Sequencer toolbar captures the frame under the playhead. Its label names the place the frame goes, for example Send → Scene 2. Hover over it for the details. To pick another target, open the Screel menu (the S) at the start of the Sequencer toolbar and use the Send frame to section. The command Send frame to Screel (Ctrl+Alt+F) in the Screel markers context of Editor Preferences → Keyboard Shortcuts does the same as Send.
To send a marker’s frame, put the playhead on the marker and choose Send. When no whiteboard, storyboard or gallery is open in Screel, the frame becomes the still of the marker’s scene, and the label names that scene. Send never remembers a scene as the last place. The marker’s context menu has no send entries. It holds Open scene in Screel, which selects the marker’s scene in your open Screel tab.
Choose where frames land
Section titled “Choose where frames land”Without a choice, a frame lands where your browser is: the gallery, or the whiteboard or storyboard panel you have open in Screel. A target list picks the gallery, a whiteboard or a storyboard instead, and the target you pick becomes the default.
- In the level toolbar, the targets are under Send viewport to in the send options menu (⋮).
- In Sequencer, they are under Send frame to in the Screel menu of the Sequencer toolbar.
- Refresh list fetches the project’s whiteboards and storyboards again.
With a linked sequence in focus, Send uses that sequence’s project. Otherwise it uses the project chosen in the Send menu, or you can create one there named after your Unreal project with New project.
While you are signed in, the status line also shows Browser: and what you have open in Screel. It ends with (away) when the Screel tab does not have focus. Send then ignores the browser and uses the last place.
When a whiteboard or storyboard is missing from the list, choose Refresh list.
The send options menu
Section titled “The send options menu”The menu next to Send in the level toolbar (⋮) covers the viewport only. It holds these sections:
- Project, only while no sequence is linked.
- Send viewport to, with Refresh list and Send with render graph.
- Presence.
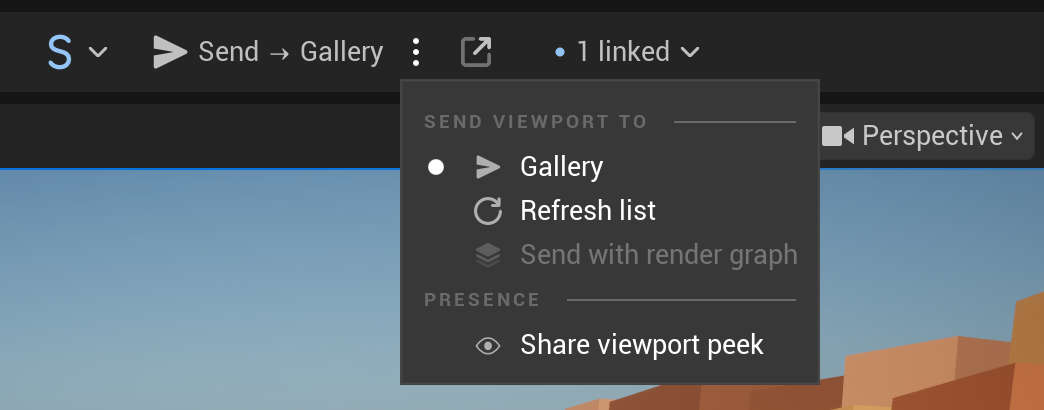
Project picks the project that Send uses while no sequence is linked. New project creates one. Markers, syncing and capture settings are in the Sequencer Screel menu. See Markers and sync. Privacy describes Share viewport peek under Presence.
Add passes
Section titled “Add passes”Passes adds depth, object ids and clay passes to every marker capture and Sequencer send. Set them per sequence under Capture → Passes in the Sequencer Screel menu. Check Depth, Object ids or Clay (lighting only). All passes checks every pass, or clears them all when every pass is checked. Set them for the whole project in Capture Passes under Project Settings → Plugins → Screel → Capture defaults: add the ids depth, object_id or clay. Beauty, the scene still, is always captured. A viewport Send from the level toolbar uses the passes of the linked sequence in focus, else the project defaults. A send to the gallery keeps every pass. A whiteboard, a storyboard or a scene takes the beauty picture, and the other passes stay in the gallery. See Capture settings.
Object ids
Section titled “Object ids”Each capture lists the actors in the frame. The Object ids pass paints each listed actor in its own grey value. A frame has 254 ids. The capture measures how much of the frame each actor fills, so an actor hidden behind a wall gets no id. The ids go first to actors marked Always give an id. Next come the actors your sequence animates and characters with a skeletal mesh. Every other actor follows, largest first. Any other actor that fills less than 0.01% of the frame gets no id. Actors without an id share one grey value and do not list. The first capture with object ids turns on custom depth with stencil (r.CustomDepth 3) for the rest of the editor session.
To choose for one actor, right-click it in the level and use the Screel section of the menu:
- Automatic id lets the capture decide.
- Always give an id gives the actor its own id whenever it shows.
- Never give an id keeps the actor out of the list. It reads as background in the object ids pass but still hides what is behind it.
- Ungroup lists the actor on its own. No group rule, folder group or environment group takes it. Always give an id and Never give an id rules still apply.
- Group as lists the selected actors as one object with one id. Pick a group, or choose New group… and type a name.
The menu works on all selected actors, and you can undo it. It saves your choice as an actor tag: Screel.Always, Screel.Never, Screel.Single or Screel.Group.<name>. You can also type these tags under Tags in the actor’s details.
For rules that cover many actors, open Edit → Project Settings → Plugins → Screel and go to Objects:
- Rules match actors by Folder, Class, Label, Sublevel or Tag with a pattern such as
GEO/Trees/*. Each rule gives Always give an id, Never give an id or Group. The first rule that matches decides, and an actor tag overrides every rule. - Group Folder Depth lists all actors under one outliner folder as one object. At 3, everything under
GEO/Buildings/MainTowerbecomes one object namedMainTower. - Min Listed Share sets the smallest share of the frame that earns an id.
- Subjects First gives animated actors and characters their ids before larger props.
Check object ids
Section titled “Check object ids”The Screel Object ids tab shows which actors get an id at one frame, and why. It renders at the Draft quality, does not sync and uploads nothing. Stop ends the render of the frame while it runs. Refresh renders the frame again.
- Move the playhead to the frame you want to check.
- Open the Screel menu (the S) in the Sequencer toolbar.
- Choose Object ids….
The tab opens and renders the frame. Drag its title to dock it beside Sequencer. The editor keeps it in your layout. You can also open the tab from the Window menu. Opened there, the tab renders the sequence that is open in Sequencer. Without an open sequence, it asks you to open one and choose Refresh.
The toolbar of the tab:
- Refresh renders the frame at the playhead again.
- Follow playhead renders again when the playhead rests on another frame.
- Off, Tint and Id map set what the frame shows. Off shows the plain frame and Tint tints each id in its own color. Id map shows only the flat id colors, as Screel receives them.
- The percent box next to them sets the strength of Tint.
- Isolate (I) dims every object outside the selection, so the selection stands out.
The tab also renders again after an undo or a redo, and after you change the Objects settings. Closing the tab stops a running render.
Read the frame
Section titled “Read the frame”Hover over the frame to read the object under the pointer: its label, its id, its share of the frame and its distance. Scroll to zoom around the pointer. Drag with the middle mouse button to pan. Press F to zoom to the selected objects, or to the whole frame when nothing is selected. Choose Fit in the top-right corner of the frame to see the whole frame again.
A blue outline marks the objects you select in the tab. A thin outline in the editor selection color marks the objects that are selected in the level.
Select objects
Section titled “Select objects”- Click an object in the frame or a row in the list to select it. Click empty space to clear the selection.
- Ctrl+click adds or removes one object. Shift+click adds one.
- Drag a box in the frame to select the objects that lie mostly inside it. Hold Shift to add them, or Ctrl to remove them.
- Press Esc, or choose the close button of the selection bar, to clear the selection.
- Press Ctrl+A to select every row in the list.
When you select objects, the selection bar appears over the bottom of the list. It counts the selected objects and their actors. It holds the commands that act on the selection.
The frame and the list share one selection. Only your clicks and keys in the tab change it. A selection in the level or the Outliner does not change it. A group row stands for every actor of the group. Expand a group row to see its actors.
A bar in the editor selection color at the left edge of a row marks an object that is selected in the level. A short bar marks a group where the level selects only some of its actors.
Two commands copy a selection between the tab and the level. They are also in the right-click menu of a row or an object in the frame.
- Select in level is in the selection bar. It selects the actors of the selected rows in the level, in place of the level selection. For an actor inside a level instance, it selects the level instance. A message lists each actor that the level selects through its parent. It also lists each actor that the level does not select, with the reason.
- From level is next to the filters. It needs a selection in the level. It selects the rows of the actors that are selected in the level, in place of the selection in the tab. It selects a group row when the level selects all of its actors. Otherwise it expands the group and selects only those actors.
Read the list
Section titled “Read the list”- Id is the object’s own id, 255 when it shares id 255, or a dash.
- On screen is the share of the frame the object fills.
- Depth is its distance from the camera. A distance with ≈ comes from its bounds, because no pixel of it shows.
- Bounds is the share of the frame its bounds can cover.
- Reason says why it got its id. Hover over it to read the full reason.
- Decided by names the actor tag, the rule, the folder group or the environment group that decided, or
Automatic. Rule numbers count from 0, as in the Rules list.
Click a column header to sort by it. Right-click the header to show or hide columns.
The warning icon marks an object to check. It is an Always give an id actor or a subject without an own id. It is also an actor that writes no custom depth, so its id comes from a depth match.
Filter the list
Section titled “Filter the list”- Search matches labels, paths and the actors of a group. Ctrl+F moves to it.
- All, Own id, No id, Never and the warning icon filter by status. Each shows how many rows it holds.
- Reason shows or hides the rows of each reason.
- Grouping shows all rows, only Groups or only Single actors.
- Foreground, Midground and Background pick a depth band of this frame. Choose the band again to show every depth.
- The depth slider sets your own range. The bars behind it show how much of the frame lies at each distance. Alt+click in the frame to set the far end to the distance under the pointer. Double-click the slider to reset it.
The frame dims every pixel outside the depth range. The filters stay when you render again.
Change how objects get an id
Section titled “Change how objects get an id”Select objects, then use the selection bar. You can also right-click a row, or an object in the frame.
- Group… (Ctrl+G) lists the selected actors as one object with one id. The name field suggests a name from the actors’ labels or their folder. Type a name, or pick an existing group. Selected groups merge under the name you choose.
- Ungroup lists each selected actor on its own and adds the tag
Screel.Single. On an actor row inside a group, the menu calls it Remove from group. - Always, Never and Automatic set the same choices as the actor context menu.
The tab renders the frame again after each change, and you can undo it.
The status bar under the list counts the objects with an own id, out of 254 possible ids. A meter shows the same share. The status bar also counts the objects that share id 255 and the Never give an id actors. Then it shows the share of the frame where geometry shows but no object claims it. Last, it shows how long the render took.
Send with the render graph
Section titled “Send with the render graph”Send with render graph renders the frame through the project render graph and sends every pass. It is in the send options menu (⋮) of the level toolbar and in the Send frame to section of the Sequencer Screel menu.
Send with render graph stays disabled until you pick a render graph under Edit → Project Settings → Plugins → Screel → Render Graph. It is also disabled during a play session, a marker sync, a clip render or another graph send. Its tooltip says why.