
Markers and sync
Place markers and keys in Sequencer and sync them to scenes in Screel. Each marker on the Screel markers track starts a scene and owns its length. Each marker holds a still key, and the plugin captures it as the scene’s still. Link the sequence first; see Link a sequence.
Add the Screel markers track
Section titled “Add the Screel markers track”When the sequence has no Screel track, the Sequencer toolbar shows Link to Screel. It offers Create project…, Link to existing project… and Add track only. Add track only adds the track without a link, so you can place markers first. You can also pick Screel markers in Sequencer’s add track menu. See Link a sequence.
With the track in place, the Sequencer toolbar shows the Screel controls.

- Add marker, the flag with a plus: a new marker at the playhead.
- Add key, the diamond with a plus: a new key at the playhead.
- The status chip: the sync state of the sequence. A click syncs all markers, or stops a running sync. On Not linked, a click opens the same list as Link to Screel.
- The Screel markers track.
The Screel menu (the S) comes first. It holds everything about the focused sequence. Its S glyph takes the session and sync color. Send comes after Add key, and its label names the place the frame goes. With the playhead on a marker, it reads like Send → Scene 2. See Send frames.
The status chip shows the first of these that applies:
- The progress of a running sync, for example Capturing 2/6.
- The read-only line, with a lock, when another session edits the sequence.
- Sync failed, or the number of markers to sync after a sync that left pictures behind. The dot is red.
- The number of gaps between markers, for example 2 gaps. The dot is amber.
- Not linked, with a grey dot.
- The number of markers to sync, for example 3 to sync. The dot is amber.
- Synced, with a green dot.
Hover over the chip for the error, the error code, or why a click cannot run.
Place a marker
Section titled “Place a marker”- Move the playhead to where the scene starts.
- Choose Add marker in the Sequencer toolbar, press Shift+M, or use Add marker at playhead in the track + Screel menu or context menu.
- A marker lasts 3 to 10 seconds, and its edges sit on frames.
- Outside every marker, a new marker reaches the next marker when that gives it 3 to 10 seconds. The marker before it grows to touch it while it stays within 10 seconds.
- Inside a marker, a new marker splits it at the playhead.
Change a marker’s length
Section titled “Change a marker’s length”Markers touch, and no edit opens a gap between two touching markers.
- Drag a grip to move an edge. On an edge that two markers share, one marker grows and the other shrinks. The drag stops where either marker would leave 3 to 10 seconds.
- An edge beside a gap moves on its own, up to the neighbouring marker.
- Dragging the body of a marker does not move it.
- With Snap marker edges to camera cuts on in the project settings, an edge within half a second of a camera cut lands on the cut.
- When you delete a marker, the marker before it takes the time while it stays within 10 seconds. Otherwise the marker after it takes the time. When neither can, a gap stays.
- When you delete a marker, Unreal asks “The marker is gone. Delete its Screel scene as well?” Marker Deleted Policy in the Markers project settings can keep or delete the scene without asking.
Use the marker menu
Section titled “Use the marker menu”Right-click a marker for its actions. The menu acts on the clicked marker, or on the selected markers when you click one of several selected.
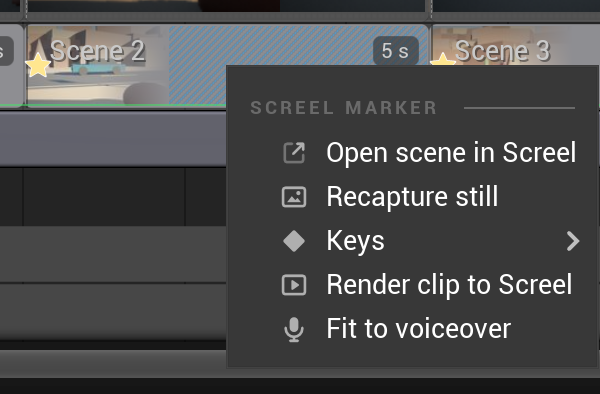
The menu holds Open scene in Screel, Recapture still, Recapture keys (N), Keys, Render clip to Screel and Fit to voiceover. Open scene in Screel is off for a marker without a scene. Fit to voiceover is off for a marker without a scene or a voiceover. The tooltip of an off item gives the reason.
A marker whose scene was deleted in Screel is orphaned. Its tooltip reads “The scene no longer exists in Screel. Use Recreate scene.” Its menu shows Recreate scene, which syncs the marker as a new scene, in place of Recapture still and Render clip to Screel.
The tools for the whole track are in the + Screel menu of the track header and in the track context menu: Add marker at playhead, Add key at playhead, Markers from camera cuts, Close gaps, Fit to voiceover and Render all clips to Screel. The Markers section of the Screel menu holds Markers from camera cuts, Close gaps and Render all clips to Screel.
Render clip to Screel is covered in Render clips. To send a marker’s frame, put the playhead on the marker and choose Send in the Sequencer toolbar; see Send frames.
Recapture still captures the still key again and syncs it. Recapture keys (N) captures every key beside the still key again. It is hidden when the marker has no other keys or the link is a storyboard. These commands work while a sync runs: they queue a follow-up. They are disabled only when you are not signed in or linked, or when another editor holds the sequence. On a refined scene they replace the refined pictures; see Refined scenes.
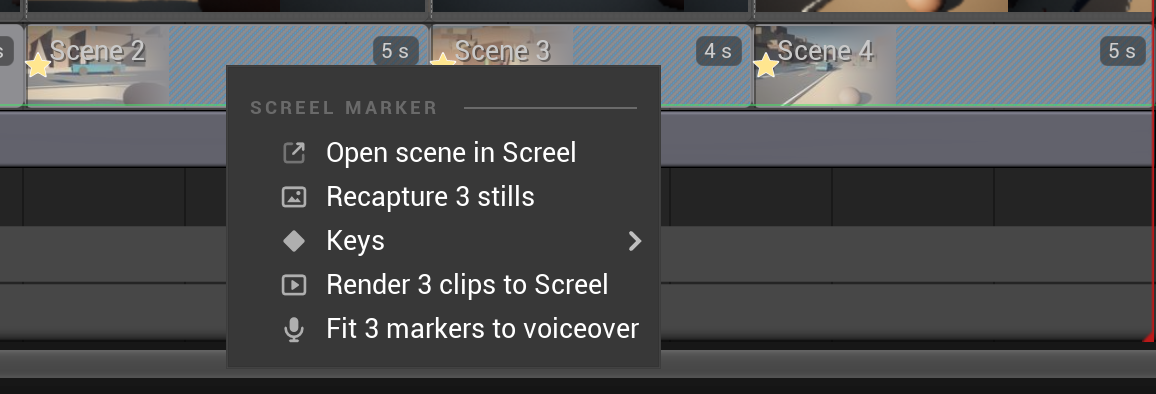
With two or more markers selected, right-click one of them to see Recapture N stills, Recapture keys of N markers, Render N clips to Screel and Fit N markers to voiceover for the selected markers. These commands leave out orphaned markers. Recreate N scenes recreates the selected orphaned markers. Keys and Open scene in Screel act on the marker you clicked.
The Screel markers context of Editor Preferences → Keyboard Shortcuts holds these commands. Add Screel marker (Shift+M) and Add Screel key (Shift+K) match the toolbar buttons.
- Recapture Screel marker, Ctrl+Alt+R, recaptures the still and keys of the selected markers, or of the marker under the playhead.
- Send frame to Screel, Ctrl+Alt+F, sends the frame under the playhead to the place the Send button shows.
- Sync Screel markers now, Ctrl+Alt+Y, works like Sync now.
Add keys
Section titled “Add keys”A key is a captured frame that becomes a keyframe of the scene. A new marker gets one key on its first frame: the still key, drawn as a star. The still key’s picture is the scene’s still.
- Move the playhead inside a marker.
- Choose Add key in the Sequencer toolbar, press Shift+K, or use Add key at playhead in the track + Screel menu or context menu.
A key snaps to the nearest free frame from the marker’s first frame to the frame before its end. Each key takes a frame of its own. A key keeps its exact time, so it can sit between whole seconds. Drag a key along the marker to move it; it snaps the same way. A marker holds at most five keys, the still key included. One sync carries at most 500 markers.
On the marker’s first frame, the star sits on the left grip. Press the middle of the star to drag the key. Press the rest of the edge to drag the grip.
Click a key to select it, and press Delete or Backspace to remove it. Press Escape to clear the selection. Right-click a key for its menu: Recapture, Move key to playhead, Set as still and Remove key. Recapture captures that one key again. Set as still moves the star to that key, and its picture becomes the scene’s still. When you remove the still key, the star moves to the earliest key left. A marker always keeps one key, its still.
The Keys submenu on a marker lists each key with its time and frame from the marker start. A label reads like “Key 2 · 1.38 s · frame 33”. The still key’s label ends in “(still)”. A key’s tooltip shows the same label, and each key in the submenu opens the same menu.
A marker move, resize, split or trim drops the keys it leaves outside the marker. A toast names each one, such as “Trim Section removed Key 2 (1.38 s) from Scene 3. Undo to restore.” A split gives the second marker a still key at the split frame. A key on that frame becomes its still key.
Add markers from camera cuts
Section titled “Add markers from camera cuts”Markers from camera cuts adds markers along your camera cuts in the time no marker covers: before the first marker, in gaps and after the last marker. It works on a master sequence too, through the shots on its Cinematic Shot track. It needs a playback range. It fills the time up to the playback end.
- Each shot gets a marker that starts on its cut.
- A shot under 3 seconds joins the shot before it or the shot after it.
- A marker over 10 seconds splits into near-equal pieces.
- Time under 3 seconds beside a marker goes to that marker while it stays within 10 seconds. Otherwise it stays a gap, and the toast counts it.
With Analyze frames for camera cut markers on in the project settings, the plugin samples the frames first. The playhead moves while it samples. Then each marker gets its still key. It also gets up to four more keys where its view changes: a later shot, a camera move or a change in the frame. A calm shot gets only its still key. Choose Cancel on the progress toast to stop without adding markers. If you play or scrub the sequence while it samples, sampling stops early and the markers use the frames sampled so far. With the setting off, the markers come at once with only their still keys.
Ctrl+Z removes all the added markers in one step.
Close gaps
Section titled “Close gaps”A gap between two markers comes from an older sequence or from time no marker could take. Close gaps fills every gap it can:
- A gap of 3 seconds or more gets new markers of up to 10 seconds.
- A shorter gap goes to the marker before it, or to the marker after it, while that marker stays within 10 seconds.
The toast counts the gaps left for you to fix by hand.
Fit to voiceover
Section titled “Fit to voiceover”Fit to voiceover moves the end of a marker so its span covers the voiceover. Right-click the marker to use it on that marker, or on every selected marker, earliest first, in one undo step. In the track header + Screel menu, it works on the last marker that starts at or before the playhead. A touching next marker gives or takes the time. Hold Shift to move every later marker instead.
Sync markers
Section titled “Sync markers”Edits sync when you release the marker: the plugin captures its frame, uploads it as the still and syncs the marker.
- A click on the status chip in the Sequencer toolbar queues every marker and syncs. Sync now in the Sequencer Screel menu does the same. Only what moved is captured again.
- Recapture all markers in the Sequencer Screel menu captures every still and key again. Its tooltip shows the counts, such as “11 stills, 28 keys”.
While a sync runs, the status chip reads “Capturing 12/39”, “Uploading 30/39” or “Syncing”, and the marker being captured has an accent outline. Click the chip, or choose Stop sync in the Screel menu, to stop it. Stop sync replaces Sync now and Recapture all markers while the sync runs. Markers that did not reach Screel keep waiting. The next edit, Sync now or Recapture all markers starts them again.
When a sync fails, a notice stays on screen with Retry, Copy details and Dismiss. Retry syncs the sequence again. The notice reads “Screel sync failed: <message>”, with no error code in the title. Copy details copies the error code, the message, a “Server message:” line, and the plugin and engine versions, so you can paste them into a support request. The notice for a link that no longer exists on Screel has no Retry.
Captures upload in up to three batches at once. Captures that wait while all three are busy share one batch of up to 16 files.
Before the first capture of a sync, the plugin waits for shaders and assets to compile, up to 15 seconds. The level toolbar status line reads “Waiting for shaders…”. It also waits briefly for textures to stream in at the marker camera: up to 1 second per capture and 3 seconds per sync.
If a picture does not upload, the marker’s timing still syncs and the scene keeps its still. The marker stays in the count of markers to sync. The Sequencer status chip shows the count with a red dot. Hover over it for the message, “N pictures did not upload: <reason>”, and the error code. A rate limit or a network failure retries after a growing delay. A retry uploads the captured pictures again without capturing again. Retries after a network failure continue. After any other failure, the plugin stops after five tries in a row: the message ends with “Screel stopped after 5 failed tries.” and the notice offers Retry. When your storage is full (“Your Screel storage is full. Free up space, then sync again.”), the plugin waits for your next marker edit or Sync now.
If you delete a marker and undo, or restore the sequence from source control, the marker binds to the same Screel scene again instead of creating a new scene.
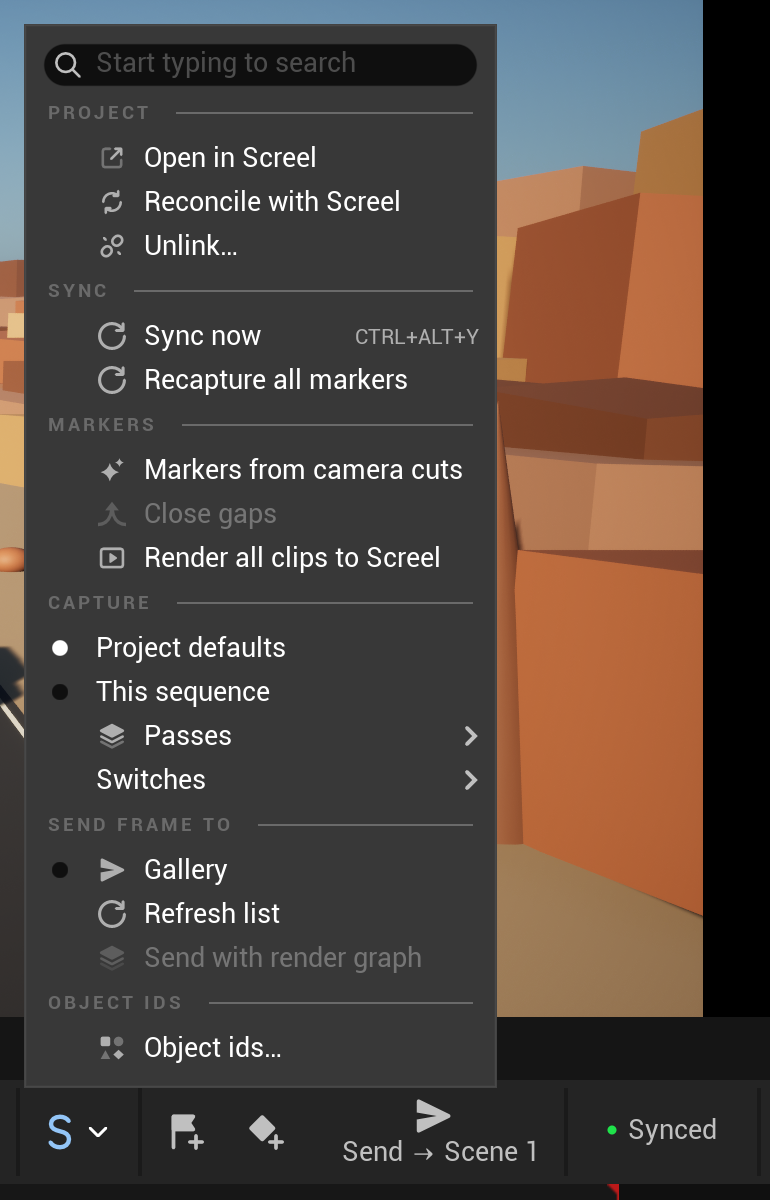
The Screel menu (the S) in the Sequencer toolbar acts on the focused sequence. Its sections are, in order:
- Project: Create project… and Link to existing project… while the sequence is unlinked, or Open in Screel and Unlink… once it is linked.
- Sync: Sync now and Recapture all markers, or Stop sync while a sync runs.
- Markers: Markers from camera cuts, Close gaps and Render all clips to Screel.
- Capture: Project defaults and This sequence, then the Passes and Switches submenus. See Capture settings.
- Send frame to: the send targets. See Send frames.
- Object ids…, which opens the object ids window. See Check object ids.
- Settings: Project settings…, which opens the plugin page of Project Settings.
Refined scenes
Section titled “Refined scenes”A scene is refined when Screel holds a styled still, keyframe or clip for it. A lock marks its marker on the track.
- An automatic sync sends a refined marker’s timing and keeps its refined pictures. A new key still captures.
- Recapture and Recapture all markers ask first when a target scene holds refined pictures, as in “Recapture 12 markers? 3 scenes hold refined pictures. The new captures replace them; the history keeps them.” No dialog shows when no target scene is refined.
- After you edit a refined marker, it reads “Changed · Recapture to send”.
- Recapture still, Recapture keys, a key’s Recapture and Recapture all markers replace the refined pictures with new captures. So does Recapture in Screel. Screel keeps the refined pictures in its history and offers to refine again.
- A key you drag to another frame captures its new frame, and so does Move key to playhead. A key you move from Screel does too. On a refined scene, the new capture replaces the key’s refined picture.
- Render clip to Screel replaces a refined clip. Its exact stills update only the raw still and keys.
- Sync now and Set as still keep the refined pictures.
When a scene turns refined in Screel, Unreal shows a toast such as “Scene 3 refined in Screel” with Open.
See Refined scenes and recaptures for the Screel side.
Capture settings
Section titled “Capture settings”Passes and three switches decide what the captures and renders of a sequence show. They cover stills, keys, Send, clips and clay clips.
- Passes add depth, object ids and clay pictures to every marker capture and Sequencer send. Beauty, the scene still, is always captured.
- The switches are Fade, Motion blur and Depth of field.
| Switch | Default | When on |
|---|---|---|
| Fade | Off | Clip renders and Movie Render Queue stills show Sequencer fades. Scene-capture stills never show a fade. |
| Motion blur | Off | Moving things blur in Movie Render Queue stills, clips and clay clips. Scene-capture stills never blur. |
| Depth of field | On | The camera’s depth of field blurs what is out of focus. The depth and object ids passes stay sharp. |
A sequence uses the project defaults until you change it. The defaults are under Project Settings → Plugins → Screel → Capture defaults. To give a sequence its own settings, use the Capture section of its Screel menu:
- Project defaults uses the defaults of the project. This is the default for a sequence.
- This sequence stores the passes and switches on the Screel track of the sequence. It starts from the project defaults. Toggling any pass or switch does the same, so you can skip this step.
- Passes and Switches list the passes and the three switches. All passes checks every pass, or clears them all when every pass is checked.
A sequence with its own settings keeps them when you change the project defaults. The Capture section needs a Screel track on the focused sequence.
Which sequence is used depends on the focus. A linked sequence in focus uses its own settings. A shot that is not linked uses the settings of its linked master sequence. While such a shot has focus, syncs and clip renders wait with the message “Return to <master> to sync.” A viewport Send from the level toolbar uses the settings of the linked sequence in focus, else the project defaults.
A change is one undo step and marks the sequence as changed, so save it. It applies from the next capture. It does not mark markers to sync. Choose Recapture all markers to capture them again with the new settings. On a refined scene, this replaces the refined pictures.
A render graph in the project settings decides motion blur and depth of field itself. Only Fade applies to it.
The scene’s Unreal panel in Screel lists the switches of each capture.
Show a scene in the browser
Section titled “Show a scene in the browser”To jump to a scene in the browser, choose Open scene in Screel on a marker, or double-click its span. It selects the scene in your open Screel tab, or opens the project when no tab has it.
To find the marker of a scene from the browser instead, use Open in Unreal in Screel. See Unreal in the Screel editor.